.comment-link {margin-left:.6em;}

The Justice Files

Wednesday, December 19, 2007

TGC: Done!

Okay, I couldn't help myself. I was at Best Buy yesterday and was magnetically drawn to the game guides. I did something I've never done before: looked up information in a game guide at the store without buying the guide.

I know, there's a special place in Taiwan for people like me.

So, armed with that information, I went home and finished off the last achievement in The Golden Compass.

I'm done. Fini. No more!


On to bigger and better things: I'll be working off the remaining achievements in Call of Duty 4 tonight if I can. I know, it sounds like I'm playing for Gamerscore now, but I'm really not. When achievements are done correctly, IMO, they encourage you to play games in ways you wouldn't have before. CoD4's achievements, for the most part, encourage that behavior. So, tonight is for fun, not Gamerscore.


Speaking of Gamerscore... I passed the 50,000 points mark yesterday, thanks to the final achievement in The Golden Compass. And I'm having a party: "CJ's 50K Bash"

You are all invited. If you are in the Nashville, TN area on December 21, 2007, shoot me an email and you can come by for the fun in person. Otherwise, boot up your Xbox 360, throw in Call of Duty 4, and join in the virtual party. We'll be going from 6PM CST to 1AM. Woo-hoo!

Labels: , , ,

Tuesday, December 18, 2007

Mea Culpa: No More Golden Compass

Okay, so the absolultely irritating Golden Compass gave me a surprise last night -- I got the Lyra Belacqua Achievement (100G) out of nowhere while replaying the London chapter. It turns out that the game's journal makes you think there are more questions to find than there actually are by showing placeholders for questions that aren't in the game.

ERGHH!!

I was able to find 4 more symbols last night, leaving only 2 more to find:

  • Sun (first sense, meaning "day"); and
  • Serpent (third sense, meaning unknown, but is probably "natural wisdom" from the books)

If you've found either of these, please let me know where you found them!

I had a thought that I might know where to find sun, causing me to take a quick trip into the game again this morning, but that was a dead-end lead.

I hate to leave 150G on the table when I'm so close, but honestly, this game is so juvenile, so insipid, so BAD... I just don't have the stomach for it.

I may take a quick look online to see if there is a walkthrough or FAQ, but if not, I'm done with this thing for good.


PS: If I *did* know where those last two symbols were, I could put together a no-spoiler, no-frills walkthrough that will get you through all 1000 points in under 8 hours. That way I can limit the suffering of any point hound that gets cornered by this dog.

Anybody interested?

Labels: , ,

Monday, December 17, 2007

Still mired in The Golden Compass *sigh*

Yes, folks, I'm afraid I'm still playing The Golden Compass.

I thought it would be just a matter of dumping a few more hours into it to get the full 1,000 points. Well, my review still stands -- it's a horrible game and the best you can expect on a single play through (without a guide, anyway) is 700 points. You can get 750 if you are willing to suffer through it a second time -- which I did on Saturday.

The thing is -- this game is a total tease. Right now I have 102 of the 108 symbol meanings needed to get the second biggest achievement in the game (Symbol Master -- 150 points.) to make things worse, I know the exact location of a token for one of the symbols (saw it, but I need to restart the level to get to it) and the particular levels to find 2 or 3 more -- just not how to find/trigger the meanings.

And that's the problem -- discovering a symbol meaning can happen from any of the following:

  • Finishing a level the fist time
  • Collecting symbol tokens in the level
  • Finding symbols in the levels using Pan's Ermine Insight
  • Completing secret objectives and then collecting the revealed token
  • Completing a conversation
  • Overhearing a conversation
  • Witnessing an event

So, even if you know what particular symbol meaning you are looking for (programming yourself to remove a schitoma), you aren't guaranteed to find the meaning, since it may only be triggered by some event.

I'm going to give it one last go tonight targeting a few specific levels and then throw the sucka onto the "abandoned" pile.

Labels: , ,

Friday, December 14, 2007

The Golden Compass: Review

Ah, a movie game. How we love to hate them. And this one pretty much deserves all the ire you can spare for it.

This game follows the plot of the movie through the eyes of a 12 year old adept girl named Lyra (LIE-ra) and a talking armored bear named Iorek (YOR-ekk.)

I can already hear you groaning.

Lyra, like all people in the world of the Golden Compass, has a dæmon, a sort of spiritual animal familiar. Lyra's life force is somehow tied to the creature, in that if it dies, she will die and vice-versa. This particular dæmon can take on the form of an ermine, a sloth, an eagle or a wildcat. Each of these dæmon forms assist Lyra in various ways throughout her journey. For example, the ermine is able to detect secrets and plot points. No, really, he detects plot points. (Pause for derisive smirk.) The sloth can be used to negotiate horizontal poles by swinging from them. The eagle can glide short distances while carrying Lyra and the wildcat can climb certain types of walls while Lyra hangs onto its back.

As weird and specialized as the dæmon concept is in this game, it is used and required throughout for almost all of the platforming action in the game. Unfortunately, the interface for all of these actions is horribly flawed. For example, the sloth will often miss a horizontal bar that you have jumped for, even though it looks like you performed the move correctly on screen.

Even worse, many puzzles require that you change characters while jumping or soaring. But the layout of the commands makes this unnecessarily tricky. For example: you could be soaring toward a horizontal bar with the eagle, which requires you to hold the X button while pushing the left thumbstick toward the bar. To grab the bar, you must change to the sloth using the D-pad -- yes, the D-pad which is normally activated by your left thumb -- only you left thumb is trying to keep the eagle moving toward the bar. Oh, and once you make the switch, you need to quickly let go of the X button and then tap it, not hold it. All of this while hoping you haven't drifted too close to the horizontal bar, because the sloth can't grab a bar that it is too close to. I could go on about the errors in this game mechanic, but you get the idea. It reeks.

The voicework between the familiar, nicknamed Pan, and Lyra can be very confusing, because, although Lyra is a girl and Pan has a little boys voice, their voices are very similar, as is their delivery. Especially in the beginning of the game, it seems like Lyra is carrying on a conversation with herself. It takes a while to tune your ear to distinguish between them.

Lyra has a couple of other talents: one of which is that she lies to adults. (Yes, you read that right -- a children's game that encourages lying to adults in almost every conversation.) The "Deception Game", as it is called in TGC, involves playing a number of inane, random mini-games to determine how successful Lyra's lies will be. The minigames are things like: avoid the red dots, get the gold dot past the moving red bricks, smash the red dots when they turn green -- you get the idea. It's simply abysmal.

Lyra's other skill is soothsaying by interpreting the motions of a clockwork device inscribed with 36 symbols, called an Alethiometer. Each of the symbols can have one of three different meanings -- meanings which you are to discover using your ermine familiar. Throughout the game, you will be presented with questions that you can attempt to answer with your alethiometer. There is a worthless minigame here that is very easy if you know all three symbols representing your question, but gets progressively more difficult if you are missing one or two symbols. The answers to the questions are sometimes required to progress the story, but are more often a feeble way of providing exposition -- and much of that is information you either didn't need or already knew if you've been paying attention to the storyline.

Occasionally, Lyra will get into a scrape where she has to play a sort of dodging game with her opponent. In other words, a D-pad direction will show up on the screen and you have to press it. If done successfully, the opponent will miss you and hurt themselves on the scenery. Yeah, I've already said enough. *Sigh*

Iorek is a fighter character. He can guard with the A button, attack with up to a three hit combo using the X button if standing still, rush an opponent or breakable object with the X button while moving, pick up an opponent using A+X and occasionally perform a special attack using Y. If you smash enough objects or enemies, you will charge up a power attack with the B button that pretty much just knocks everyone down. That's it. When you play Iorek you are pretty much just mashing the X button. There's no real depth of play here. And to make things worse, if you are moving the character even slightly when you press X, it counts as a rush instead of a hit, which can get really annoying when all you are trying to do is make the bear face his opponent.

Given the above, is there any reason to play this game? Not really. If you've seen the movie or read the book, then there's nothing new here in terms of story. If you just want some easy Gamerscore, you can get about 700 or so playing through the story for a very frustrating, eight to twelve hours. (The additional points will require a LOT of cursoring over the environment on every level using the ermine dæmon's ability and the completion of a secret challenge on each level.)

So, if you really want to play through the story because you don't get out much and don't want to be seen entering the theater to watch an arguably blasphemous children's flick, then take your licks and rent this sucker. The story is interesting enough to suffer a single play through if you are that desperate to go through it. Otherwise, leave this one behind.

This one gets 2 rotten cabbages out of 10. Yeah, it stinks.

Labels: , , ,

Wednesday, December 12, 2007

Call of Duty 4: Finished it on Veteran!

I did it! It took some work, but I did it.

And... for those of you who read yesterday's post, I was able to get a checkpoint at the blast doors the second time I got there.

I'm not sure, but I think I may have triggered the checkpoint by picking up one of the flash grenades sitting in the alcove to the left of the blast doors. I was desperate to trigger a checkpoint and threw a flash at random so that I could pick up one that was laying on the ground. I picked it up and *checkpoint*!

I wasn't using flash grenades when going through that level (maybe I should have) so the other few times I'd gotten to the blast doors, I wasn't able to pick any of the grenades up.

Of course, there could be another explanation -- I had over 3:20 on the countdown clock when I got to the blast doors that last time -- almost a minute more time than I'd had on any prior run. It may be that they don't count the checkpoint if there isn't a reasonable amount of time left to complete the level.

Labels: , ,

Monday, December 10, 2007

Call of Duty 4: How I beat "One Shot Kill" on Veteran

Call of Duty 4 on Veteran is getting insane! Three bullets and you are reading an obscure quote on the nature of war.

My most recent conquered nemesis in this game was the "One Shot Kill" level. Making the actual kill is fun, but after that, it gets incredibly hard. Here's my experience with the end of this whacked-out level.

First off you find yourself in a parking lot near some apartment buildings. You have a sniper rifle and a pistol. There are high-radiation zones on all sides, and there are dudes pouring out of buildings and helicopters coming from all sides to kill you.

It took me around 30 tries (no, seriously, 30 tries) to figure out that my best bet was to run to the right through some bushes to find some school buses, wait for three guys to come running between a gap between the buses and a building and pop 'em. Then run toward an apartment building marked by your compass, taking your chances at no-scoping a couple of guys as you sprint for the doorway.

Checkpoint. (*whew*!)

You run through the ground floor of the apartment building to emerge in a courtyard. An event happens (awesome, but I don't want to spoil it) and your partner is now left without the use of his legs. You now have to work your way toward the rendezvous site by carrying him a little ways, dropping him strategically, fighting some baddies and moving on. This part isn't too bad -- you go through an outdoor area and then through another apartment building with a couple of checkpoints in-between.

Then it gets really ugly.

You exit a building into an area where a travelling amusement park has been abandoned. You set your partner down as indicated on your compass and run about setting claymores to prepare for an onslaught.

You may have an automatic weapon now, but you really only need a sniper rifle and pistol for this part. It is extremely difficult. I found that placing a line of claymores CLOSE to your sniping position on the Ferris wheel (within the line of abandonded cars) helps immensely. (Thanks to The Evil Dad for this tip!) Take out as many baddies as you can at a distance, letting the claymores take out any that get close. You may have to revert to a pistol if anyone gets through the line of claymores, but if you are a fast shot and take out as many people in the distance as possible, you can do it.

And seriously -- having the claymores close in makes all the difference. When I first tried this part of the level, I had them out at the fence (about 50' out) and was getting killed all the time.

You kill the last guy and *Checkpoint*.

As you wipe your brow, your lame (in more ways than one) partner shouts out "Choppers comin'! Get ready."

Four or five helicopters fly in dropping four soldiers each and another 8-10 soldiers come running out of the apartment buildings. You can try to pick off some of the soldiers in the air as they drop down their rope lines, but you'll get eight of them at most due to the way the helicopters enter the area. In the main battle area, there is no safe place to hide. Most, if not all, of your Claymores have detonated. This is where it gets ugly.

I discovered that the only way I could finish this part and survive was to take the chicken's way out. Here's what I did:

From the checkpoint, I ignored the incoming helicopters, ran out into the middle of the battle area and exchanged my pistol for a sub-machine gun. I then ran to the white picket fence and laid a line of C4 satchels all along it. Then I ran to the apartment building on the right (as you face away from the Ferris Wheel) and hid in an L-shaped corner where I could peek back at the fence.

As the helos arrived, I used my sniper rifle to pick off anyone I could seen from around the corner. (This is important -- you need to get rid of as many of these guys as you can.) I was really just waiting for the rescue chopper to come in, but this was the only place on the map I could find where I could get some decent cover and still take out some bad guys. You end up sniping about 15 guys in and around the fence and bumper car arena. They will occasionally barrage you with grenades, but you are almost completely safe from them if you stay tucked around the corner when you see the grenade icon.

As soon as the rescue helo dropped, I switched to my C4 detonator and blasted everyone hanging out near the fence. (Remember those satchel charges?) I switched to my SMG and made a run for the helicopter, taking out any remaining bad guys between me and the helo that the Marines might have missed. After taking a brief, healing rest, I ran to my partner, picked him up for the last time and made a bloody, blind run for the helo.

*Checkpoint* and end of the chapter.

So far this has been the hardest level I think I have ever played in any videogame. I was so frustrated with the first wave of enemies (where you set the claymores) that I took a 20 day sabbatical from the game's Campaign! I was dumbfounded when I hit the checkpoint for it last night and realized the battle wasn't over.

Labels: , , ,

Wednesday, December 05, 2007

Assassin's Creed: Dealing with Templars

By far, the most difficult enemies you will regularly encounter while playing Assassin's Creed are the Templars. There are 60 of them spread through out the game -- about ten in each of the major cities (Acre, Damascus and Jerusalem) and another thirty or so in the Kingdom area. They are easily identified by their white robes with a red cross on their chest and silly-looking, canister-shaped helmets.

These guys are tough. By comparison, I can drop any guard in the game with a single thrown knife, yet these guys will still come running at you after sinking four knives into their chests. There are really only two ways to deal with these guys:


  • Stealth -- Fortunately for you, if you can catch a Templar unaware, you can slip your hidden dagger into his back and be done with him. Templars always are found with a chest* behind them, which can sometimes make a stealth approach difficult, but not impossible.

    If the Templar has his back to a wall, you can often hang from the wall, equip your hidden blade and then select the "Assassiate" option by hitting the X button. It's one of the coolest kills in the game.

    I've also found that if the Templar is looking straight ahead with his back to a corner, that I can sneak up on him by hugging a wall to either side of him without him noticing. Once you are behind him, show him the purpose of your blade.

  • Brute Force -- When stealth fails (or isn't possible) you are going to have to fight these guys. The fights are ugly. You can't combo-kill them, they break through your defense posture, and they throw you around like a rag doll at every opportunity. My best approach to taking these guys down in this situation is:

    • Only slash once with your sword and immediately block. (Combo kills fail, because the Templar will almost always counter your second strike.)
    • Try to get a counter in using RT or RT+X
    • Jump away using RT+A
    • Do your best to grab him after his first hit and throw him to the ground! If you can get him to fall, then run to him and stab like a madman.
    Hitting him when he's down is the only way I've been able to consistently kill these guys in a fight. But getting the grab is risky and difficult. Try it enough times, though, and you'll eventually get him -- and without getting killed if your sync bar is reasonably well developed.

One bonus to dropping a Templar is that your sync bar will immediately refill, which can be a welcome event if you encounter a Templar accidentally while fighting off (or running from) a group of guards.

Another benefit is that the Templar is permanently retired from the game and you are one step closer to getting the Personal Vendetta achievement.


* The chest is the game's recognition of the Templar's creation of modern banking. They were the first to allow you to deposit money or gold in one place and withdraw it from another after presenting a draft or check. The system was initially put in place as a way of protecting pilgrims during the Crusades. Highwaymen would have nothing to steal if travellers deposited funds with the Templars before beginning their pilgrimage.

Labels: , , ,

MASS EFFECT: A Critical Look Backward

I finished my first run through of Mass Effect on Sunday. Overall, it is a wonderful game. Yeah, it had it's moments when the framerate would slow to zero, but it never locked up on me, and those moments were reasonably rare. (And, honestly, about as common as in KOTOR and KOTOR II -- only the old Xbox would lock up.)

I do have one negative observation, and it's not a big one, but I feel that they skimped on the story somewhat when comparing this game to KOTOR or Jade Empire. My first run through KOTOR took 106 hours. No, seriously -- I still have the gamesave. I finished Mass Effect in about 38 hours -- and that included exploring every single planet, exhausting every Paragon dialog tree I could find, and revisiting all of the dialogable characters on all of the major planets at least twice (I was at the Citadel at least six times.) Add to that the fact that almost a third of that time was spent exploring maps, and we are looking at a significantly smaller story.

Understand that I loved the exploration angle of the game, and the fact that every line of dialog was spoken and acted out beautifully only contributes to my affection for this title. Not only that, but finishing the game was a satisfying experience (unlike Halo 2.) I just see, in comparison to prior BioWare efforts, a shortfall on the breadth of story options presented. While there were some very exciting side-quests and great multi-tiered moral dilemmas (especially on Noveria!), most of the side quests were fairly simple and quick to finish, again in comparison to KOTOR and JE, where the side quests tended to be rather involved.

And there were a couple of places where the story fell short for me -- where I felt like the game teased me to open up new story lines that never appeared:

  • Shadow Broker: I was approached at one point to provide some data to the Shadow Broker, which I did (Renegade!) And it seemed as if there would be a continuing subplot involving this mysterious information trader. But nothing else ever happened. Maybe I missed a trigger point somewhere (possible, but doubtful) or maybe when I play through as a true renegade more possibilites will open up. But this plotline felt like it got dropped on the floor shortly after I left the Citadel.

  • The Consort: I was sure that there would be an ongoing plotline here as well. But she was involved in two Citadel-only quests and then her plotline dropped as well. I was convinced that following the Paragon's Path would reunite me with her later in the game, but she disappeared after solving the problem with the slandered Elcor.

  • Hansen (the drunk in Chodda's Den): I never did find a real plot line involving this guy. Did I just miss it? He's a topic of conversation with the mechanic beneath the Med Center, but I couldn't figure out where he fit into the story. It's possible the quest involving him was so short, I don't remember it, but man, it must have been totally insignificant. Or maybe I triggered something with my explorations that short-circuited his part. Anybody else experience something different with him?

    Edit: I've since learned that I didn't get the Hansen storyline because my character was an orphan. Interesting!

Again, I think this is a wonderful game, and I plan on playing it through at least two more times after I've gone through the glut of November releases. My complaints here are minor. They just serve to show that the game isn't perfect and to contrast this title against the shadows of prior BioWar giants. Be assured, Mass Effect has safely joined their ranks.

Now it's back to my second most anticipated game of 2007: Assassin's Creed. I'm on Day 6 and should have a retrospective for you all by the weekend.

In the meantime, look for another tip on Mass Effect and several for Assassin's Creed as the week progresses.

Labels: , , , ,

Monday, December 03, 2007

MASS EFFECT: Tip Sheet #5 -- Licenses

One of the most convenient things in Mass Effect is having a store on board the SSV Normandy. It's a great place to sell your high level gear to pump up your credit balance.

It can also be a source for the very best weapons in the game (Spectre gear Mark X) if you play things right.

The key to getting at that high-profile gear is licenses. Throughout the game, you will find vendors selling licenses for various manufacturers. Buy every one of these you find. These licenses provide your Quartermaster the ability to procure weapons, armor and upgrades from those manufacturers. Not all vendors will have licenses for you to buy at first, but each will have at least one to offer throughout the game.

The vendors that have licenses can be found in the following locations:

  • Citadel Presidium -- Financial District: A Hanar sells a limited selection of goods here.
  • Citadel Wards -- C-Sec Academy: The C-Sec supply officer
  • Citadel Wards -- Upper Market: A Volus has a stall here
  • Citadel Wards -- Lower Market: A Salarian has a stall here.
  • Citadel Wards -- Medical Center: The human doctor with a shady past
  • Noveria -- Look for an Elcor in the middle of the Cafeteria
  • Feros -- The only Salarian on the planet offers his wares in a discreet corner

You can collect all the licenses if you follow this simple procedure:

  • While at the Citadel, visit all of the vendors and buy a license from anyone who offers it. (Licenses are listed under [Standard Items] and are usually at the bottom of the list.) Note that you will not be able to purchase items from the C-Sec officer until after you have been enlisted into the Spectres.
  • During each major plot segment, visit the vendor posted there (Noveria, Feros) and see if a license can be purchased.
  • After the completion of each major plot segment (Citadel, Rescue Liara, Noveria, Feros, Virmire), revisit each of the vendors you've met so far. They will each have new stock, often including a license. Always buy the license first!

As long as you are leveling your character up at a decent rate by exploring in between missions, you should end up getting all of the licenses. You'll know you have them when the Normandy Quartermaster starts selling you Mark X Spectre weapons, like the HMSR X Sniper Rifle.

Labels: , , ,

MASS EFFECT: Tip Sheet #4 -- Romance

Like all BioWare RPGs, Mass Effect has a romance subplot that you can explore. Unlike other BioWare RPGs, though, in this game you can only romance a single character at a time. Once you've advanced past a certain point in the romance plot, any other characters are locked out. The romance subplot is not as deep as it is in other BW games, but it has a double pay-off: a romantic interlude is played out in-game and you can earn an achievement for it.

There are three romanceable characters in Mass Effect: Kaiden, Ashley and Liara. You are given a hint at this in-game -- as you approach any of these characters aboard the SSV Normandy, there is a short cut-scene where the characters exchange longing glances.

Let's look at each and what's required to romance them.


  • Kaiden

    Kaiden is an appropriate love interest if you have a female Shepard. You can enter into the romance subplot by approching him on the second deck of the Normandy and making personal inquiries. Respond to him as a potential lover, not a captain, which generally means selecting all of the answers at the 1:30 and 10:30 positions on the dialog wheel.

    You will need to talk to him immediately after gaining access to the Normandy and after every major mission. (Major missions are those that are flagged on the galaxy map, such as Noveria.) Be sure to go to him after every mission and make a few checks in-between.

    Finally, make sure Kaiden doesn't get killed. Without spoiling anything, realize that there are two places toward the end of the game where you either may or will be sacrificing Kaiden or Ashley. Make sure that it's Ashley that is put in danger, not Kaiden!

    Also, if you get Liara early in the game, do not follow any lines of dialog along the lines of "I want to know more about you" as this line of dialog could preclude romance with Kaiden.

  • Ashley

    Ashley can be romanced by a male Shepard. Like Kaiden, you need to talk to her about personal matters on the Normandy after every major engagement (including the completion of the Citadel main quest where you gain access to the Normandy.) All of the comments above that apply to Kaiden apply here: don't let her get killed and don't follow the romance track with Liara. Ashley can be found on the third deck of the Normandy, cleaning weapons.

  • Liara

    Liara can be romanced by a male or female Shepard.

    In order to get the romance quest to work, you will need to rescue Liara as soon as you leave the Citadel. If you take on any other major plot quest (such as Noveria) before rescuing her, you can kiss this romance goodbye.

    Once she's been rescued, you will need to talk to her about personal issues after every major mission. Always use the 1:30 and 10:30 responses on the dialog wheel. She can be found on the second deck of the Normandy in the closet (?!?) at the back of the Medical Lab (where Dr. Chandra works.)

    As with Kaiden and Ashley, you will need to ignore your character's other romantic interest (Kaiden for females, Ashley for males) until the sparks are flying with Liara.

    Unlike Kaiden and Ashley, you will not have to worry about keeping Liara alive. If you've gotten to her early and made all of the amorous advances on time, this one is a slam-dunk.

    One other thing to note: If you've already established a relationship with Kaiden or Ashley and that character gets killed, you cannot use Liara as a fallback to finish the romance quest. Trust me, I've tried. :(

Labels: , ,

Friday, November 30, 2007

MASS EFFECT: Tip Sheet #3 -- Thresher Maws

One of the most annoying enemies you will come across while exploring planets in Mass Effect is the Thresher Maw. These sandworm-like creatures have an acid attack that ignores your shields and a one-shot attack that will kill your party instantly, no matter how healthy your Mako is. When you first meet up with them, you will probably find yourself using up lots of OmniGel to restore your Mako -- or, even worse, getting killed and losing whatever progress you've made in the level.

I've learned a few things about these evil creatures that you might find useful. I can now survive most Thresher attacks without using any OmniGel. So here are my tips for "Defeating a Thresher Maw for fun and XP."

  • When you first meet a Maw, leave the area and save your game. You don't want to lose any progress you've made on the planet so far! Get in your vehicle, if you aren't in it already and head out of the battle area. (The battle area of a Maw is limited to the flat, somewhat circular area you find her in.) Try to get out of it's line of sight, because it can still use it's acid attack on you if it can see you.

  • If you get hit with acid, leave the area and use your OmniGels. It only takes two or three acid hits to destroy your Mako, so repair as soon as you can.

  • Stay in your vehicle. The Maw moves too quickly for you to even think about attempting to take her down on foot. Check you Codex entry on Thresher Maws for more information.

  • The basic plan of attack is to move around the outer edge of the flat area and shoot at the Maw whenever she shows herself. If the Maw is facing away from you, stop your Mako, zoom in with the left trigger and take a few shots. As soon as she starts to move her head and sink back into the ground, move to a new position along the periphery.

  • If the Maw is facing you, do not stop, or at least be ready to move and play some chicken with a blob of acid. When you will see her rear her head back, move! She will be shooting acid your way. Move laterally (across, not toward or away) and the acid should miss you.

  • When the Maw is underground, you should be moving. Period. As I said earlier, try to stay along the periphery of the battle area, but still on the flat part. As long as you are on the flat portion, she will continue to appear and fight. I tend to pick a direction (clockwise or counter-clockwise) and stick with it for the entire battle.

  • Never move toward her last position -- always drive away from her. Driving toward her is about the same as staying in one place -- she'll kill you in one shot with her attack from below.

  • Never move toward the Maw when she is exposed. This is basically suicide. If you are close enough for her to perform a melee attack, you will die in one or two hits. This thing has no respect for shields.

  • Toward the end of the battle it will seem as if you aren't doing any damage. Somehow, these creatures' skins get tougher as their health gets weaker. Just keep plugging plasma bolts into her and running away. You'll eventually bring her down.

That's it. The main thing is to save first, keep moving, keep shooting, gel in a safe place if you need to, and never move toward her.

Good luck on your next big kill!

Labels: , , ,

Thursday, November 29, 2007

MASS EFFECT: Tip Sheet #2 -- Exploration

Once you've left the Citadel, which can take up to 15 hours or more if you are thorough, you have the choice of following the main quest tasks, resolving your Additional Assignments, or just exploring. As it turns out, all of these involve exploration to some degree.

The game has two different exploration experiences: System Exploration and Terrestrial Exploration. We'll take a look at both today.


SYSTEM EXPLORATION

System exploration involves exploring a solar system to discover resources, vehicles (plot/combat areas) and other hidden objects.

You should engage in the System Exploration task every time you enter a new solar system, regardless of how you got there. (Main story line, Additional Assignments or random system hopping.) To find everything a system has to offer, follow these steps:

  1. EXAMINE UNEXPLORABLE PLANETS

    Move your cursor over every planet or moon on the map and select "Travel" with the [A] button. If the planet has "Scan" as an option, do it. You will find some form of resource or artifact, which will work toward completion of your resource/artifact tasks. If the planet has a "Land" option, take note of it and move on for now -- it's easier to keep track of things if you complete all of your System Exploration tasks before taking on a planetary exploration.


  2. LOOK FOR HIDDEN OBJECTS

    Many systems have one or more hidden features, such as ships or mineral-laden asteroids. These objects will give themselves away with a quick flash of light every few seconds. (The rotational speeds of these objects are fairly slow, so the flash can take five seconds or more to repeat.) Slowly move your cursor over the whole system looking for the flash. If you see it, move the cursor over to the flash and you should get the prompt "Unknown Object". Select "Scan" from the menu to find out what it is. If it is an asteroid, you can scan it again to obtain the resource or artifact that it contains. If it is a ship, you will probably be presented with the "Board" option. Take note of the object and move on until you've finished looking for hidden objects.

    You can shortcut this process a little bit by being proactive: many of the asteroid belts in the game contain hidden objects. Rather than waiting for the glint of light, you can run your cursor over the entire belt looking for the "Unknown Object" prompt. Note that not all asteroid belts have hidden objects and not all hidden objects are in asteroid belts -- so you still need to be patient and look for flashes, but it's kind of fun zipping around the belts trying to see if you can find something interesting.


  3. BOARD ANY VEHICLES

    Vehicles will be highlighted with a cluster of four diamonds on the map. (Note that some vehicles are visible when you enter the map, others are hidden and need to be discovered as described in step 2.) Boarding a vehicle will play out like entering a building on a planet or moon. There are usually plot points associated with them. Note that if you are just randomly exploring, you may be opening up task plotlines that you have not yet been given. This isn't a big deal in terms of completing the game, since your log will clue you in on what to do next, but you do miss out on any conversations that would have normally initiated the mission.


  4. LAND ON ANY EXPLORABLE PLANETS

    Landing on a planet (using the "Land" option on the wheel menu) will initiate one of two scenarios: You will either end up in a main plotline area like a city or settlement or you will land on the surface in your rover, the Mako. Plotline areas will play out like the Citadel, only with a lot more shooting. :) If you land on the surface, then you are now prepared to do Terrestrial Exploration.


TERRESTRIAL EXPLORATION

Terrestrial Exploration involves moving around the mission area of a planet or moon, investigating marked objects, discovering hidden objects, fighting off Thresher Maws and exploring buildings.

While your first inclination will be to race the Mako to each of the points on the map, I'm going to suggest that you take a more organized approach to exploration. This more measured approach will help you finish your Additional Assignments more quickly, avoid backtracking and earn you beaux coups credits.

There are hidden points of interest on every planet/moon that you can land on. Most of these are mineral deposits. Not only do you gain experience from surveying these deposits, but you also earn credits on an escalating scale. Every new deposit you find will pay you more money than the previous one.

I've also found hidden anomlies, bases and downed probes. So you can't assume that the map shows everything.

The only way to find these hidden items easily is by using the Mako's RADAR. So let's look at how you go about doing this:

The first thing to notice when you land on a planet is that the mission area is always the same size -- and it turns out that it is only slightly larger than twice the area covered by the Mako RADAR. This means that you can conduct a full planetary survey by running around the inner perimeter of the mission area and then running to the center of the map.

So here's what you do:

As soon as you land, go to the map screen. For now, ignore anything already marked on the map. Use the map marker and mark a position that is a quarter of the way in from the nearest corner. For your first time, just guess, or even mark the corner itself.

Now leave the map screen and head for the marker in the Mako, watching the RADAR more than the landscape. As you approach the edges of the mission area you will see parts of the radar go reddish-orange. Move away from that boundary until it shows up as a thin line on either the right or left side of your RADAR. Now, continue moving toward the marker, keeping the boundary you found as the tiniest of marks on one side of the RADAR until you come upon another boundary at the top of your RADAR. (You may need to re-orient the RADAR/viewport using the right stick.) When you get situated so that you have two VERY thin red lines on two sides of the RADAR, go to your map and note the Mako position. This is the correct distance to set your marker from any corner while conducting survey.

  1. From the map screen, set a new marker to an adjacent corner of the map.

  2. From the Mako, travel toward the marker keeping the left or right boundary as the thinnest of lines on your RADAR. As you drive watch the RADAR for any objects that might show up. Anything that shows up THAT IS NOT ALREADY SHOWING ON THE MAP needs to be surveyed/investigated. When your investigation is complete, return to where you left the original imaginary path and continue toward the marker. (Always keeping the border as a thin line on your left or right side.)

  3. When you reach the marker, head straight for the corner of the map until the corner shows up on the RADAR. This will catch any items hidden in corners -- and there are a few.

  4. Head back to the marker position.

Repeat the above steps until you have surveyed all four sides of the map and all four corners.

Most maps have two or three hidden items. Most of them will be mineral deposits that you will need to survey before they show up on the map. Luna (Earth's moon) is an exception -- all of it's hidden features are enemy bases.

Once you've completed your surveys, you can investigate the other items that were originally marked on your map.

  • ANOMOLIES (question mark icon)

    These can be alien structures, crashed ships or bodies. Anomolies provide equipment or artifiacts that you can collect.

    Note that some anomolies are near enemy outposts or Thresher Maws. Be prepared!

  • DEBRIS (stacked brick icon)

    These are usually probes that have fallen out of orbit or crashed ships.
    These will always yield equipment if you have high enough electronics skills.

    Debris will sometimes be guarded by enemy agents or Thresher Maws.

  • PLOT POINT (exclamation point icon)

    So far, these have always been enemy outposts or distress beacons.

    Outposts will be buildings that are usually heavily guarded with a combination of soldiers and rocket artillery or soldiers and snipers in towers -- I haven't yet seen an installation with rockets and sniper towers.

    Your strategy will vary with the type of protection. If the installation has rockets, then stay in the Mako and find a position where you are exposed to only one rocket launcher at a time, if possible. You can easily identify these on the Mako RADAR as the rocket emplacements are marked by red diamonds.

    This is where the Mako shields come into play. Be bold. Drive up to the launcher such that you can get it's on-screen health assessment in your sensors and start firing, but don't get too close or the Mako's gun won't be effective. You can usually fire on the installation and play chicken with the rockets if you are far enough away. Pay CLOSE ATTENTION to your shields. As soon as the Mako shields get down to one or two bars, high-tail it out of there and find a place to recover. Note that the rocket launcher will be restoring it's shields and may perform repairs, so don't wait too long. If there aren't any ground troops, you can usually take out a rocket without losing much shield at all. Just be bold, use the left trigger sight, and hammer away with SHORT BURSTS to avoid overheating your weapon. Once youve eliminated the rockets, you can take out the ground troops with the Mako, or get out of the Mako ([B] button) and pick them off with your team, which is typically more effective.

    If you have to deal with sniper towers, it is better to make a ground offensive, especially if you have trained snipers on your team. Take out the snipers first, get in the Mako to get close, and then mop up any remaining resistance.

Labels: , , ,

Wednesday, November 28, 2007

MASS EFFECT: Tip Sheet #1 -- Miscellaneous Beginner Stuff

Here are some tips I've discovered to help along your Mass Effect Experience.
  • ALWAYS HAVE A CHARACTER WITH ENGINEER SKILLS IN YOUR PARTY

    The engineering skill has two talents that are vital to exploring the Milky Way: Electronics and Decryption. The electronics talent is used to unlock most containers, including probes that have fallen to the ground. The Decryption talent is used for unlocking containers that use encrypted data locks, such as computer terminals and secure containers. If you want to have lots of cash and omnigel, you are going to need to be able to open any container you come across and these two skill enable that.

  • MAX OUT YOUR ENGINEERS' ELECTRONICS AND DECRYPTION TALENTS BEFORE ALL OTHERS

    This is related to the first tip -- once you start jumping off the main questline and begin exploring, you will immediately come upon probes and secured containers that require high talent levels in either electronics or decryption. Not having a high enough skill means that you cannot open the container (even with OmniGel) until you have raised the required talent level and returned to the container location. Even then, the original failed attempt will require that you use some of your valuable OmniGel to open the container. There are no second chances at the button mashing minigame.

  • MAX OUT YOUR MAIN CHARACTER'S CHARM OR TAUNT TALENTS WHENEVER POSSIBLE

    There are dialog options fairly early in the game that require the maximum charm/taunt points to be applied for the options to be available. If you see a darkened charm/taunt in the dialog ring, it means you don't have ennough points applied to that talent -- and you won't be able to choose those options. So always level up your conversation skill of choice, ignoring all other skills, whenever there is a free space available. If not, you could miss key opportunities to increase your Paragon or Renegade status.

  • IN THE EARLY STAGES OF THE GAME, TURN UNWANTED GEAR INTO OMNIGEL -- DON'T SELL IT.

    You are going to need OmniGel when you go exploring to fix your rover. You are also going to need it to open containers whenever you bungle the button-mashing mini-game. You can carry up to 999 OmniGels, so don't be afraid to gel everything you can get your hands on. (When driving the rover, it will look like you can only carry 99 OmniGels, but the Equipment screen will show you the actual number you are carrying.) My rule of thumb is to convert any equipment with a Mark I, II or III value and sell anything with a Mark IV rating or higher.

  • DECIDE ON TWO COMPANION CHARACTERS EARLY IN THE GAME AND STICK WITH THEM

    Not only will this get you two achievements at the end of the main quest (using XXX character 85% of the time) but it also simplifies your decisions about what equipment to gel or sell. For example, my A-team is Ashley and Tali -- a Human and a Quarian. That means that I can sell or gel all Asari, Krogan and Turian armor that I find without begin too concerned. (I do occasionally re-outfit my other characters when I'm in the ship's bay, but I'm not overly concerned about it -- they are rarely needed except for specific missions.)

    Also, my Shepard has no biotic abilities. Since Tali and Ashley also do not use biotics, I am able to gel/sell biotic pumps without regret.

    What this leads to is that you can quickly re-outfit your main team from the equipment screen when you are planetside and immediately gel any unused, low-level equipment from the same screen. Unused high-level equipment (Mark IV and higher) should be sold -- unless you REALLY need the gel.

    One other benefit: between your missions and the sales value of all the HQ equipment you aren't hoarding, you should find yourself earning the Rich achievement (over 1,000,000 credits in your account) in 20-25 hours of gameplay.One other note: you can only have 150 items in your possession at one time. That includes upgrades and ammo. So keeping your larder lean will also keep you from being forced to gel any equipment you scavenge.

CONVERSATION POINTERS:

  • Conversation options on the right side of the wheel usually lead to a conclusion/termination of the conversation. Options on the left tend to expand the conversation.

  • If you want the full experience, always select and thoroughly explore the "Investigate" option when it appears.

  • Slightly charming answers usually appear at the 1:30 position of the wheel. (Unless an Investigate option has opened up too many follow-up options.)

  • Slightly taunting answers usually appear at the 4:30 position of the wheel.

  • Very charming answers will appear in blue text at the 10:30 position when available. This is the best path to Paragon points and a non-violent resolution to a situation. If the option is grayed-out, you have insufficient Charm talent to exercise that option.

  • Highly taunting answers appear in red text at the 7:30 position when available. This leads to high Renegade points and potentially will start a firefight. If the option is grayed-out, you have insufficient Taunt talent to exercise that option.

Labels: , , ,

Tuesday, November 27, 2007

MASS EFFECT: A Game with Two Minds

Those of you who know me know that I've been waiting on this game more than any other for two years now. I mean, it's a BioWare game that allows you to travel thoughout a sparsely-populated Milky Way Galaxy.

Well, it's been worth the wait. The game has some rare framerate issues that will bring the game to a temporary halt, but that is the only real complaint I can find with it.

The story is solid. The voice acting is superb. And the dialog ring interface is a quantum leap for adventure-style gaming.

As long as you stay on the main quest, the game has the deep, immersive feel of any other BioWare title. You go into a city or facility; talk to LOTS of people; solve puzzles; make moral decisions and engage in battles. This part of the game is extremely well-crafted. If the tasks seem trivial at times, the dialog associated with the task makes up for it.

Off the main quest, though, things are different -- which may put BioWare fans off at first until they understand that the exploration side-missions are meant to provide more of a sandbox experience. You can freely explore any planet in the system that allows you to land on it. There you will find a number of points of interest that you can drive your rover to and others that you can discover by just driving around and watching your radar. This is much more of an action experience. You engage in numerous battles, collect items and push portions of the story further, but there is very little exposition or dialog.

This let's you play Mass Effect according to your mood: when you are looking for the full-blown RPG experience, you play the main story line, where each city can have you engaged for 2-6 hours. When you just want to get into some action, you can either investigate a secondary mission or just pick a solar system at random and start exploring.

One caution that all adventure games should know, but still applies here in spades: SAVE YOUR GAME BEFORE AND AFTER EVERY BATTLE OR MAJOR MORAL DECISION. The game does auto-save, but it's rare, and usually means replaying over an hour of the story when you've bungled it. Going into a structure will usually provide an autosave, but an hour of wandering a landscape only to be gobbled up by a Maw will send you back in time to where you first landed on the planet if you haven't saved your game.

This is definitely a five-star title. The framerate problems are annoying but rare, and can almost be dropped from consideration.Be aware, though, I've seen the screen go still for up to five seconds and recover. So don't assume you have a lockup whenever the framerate goes to a standstill. I've put over 20 hours into this game and have not had it lock up on me yet.

Buy, buy, buy. This is the kind of title that requires you vote with your pocketbook so that publishers will keep coming out with this kind of expansive, high-quality title.

Labels: , , ,

Assassin's Creed -- Achievement Tips

EAGLE'S FLIGHT (20G)

This achievement requires that you stay in battle for at least 10 minutes. There are three fairly simple ways to do this:

  1. THE CHEATER'S WAY

    Go into the Kingdom and run to your nearest lookout point (any of the towers where you synchronize your area memory will do.) Simply pick a fight with a guard to attract his attention (don't kill him) and then quickly climb up the tower, avoiding any rocks that might get thrown at you. Once you are at the top of the tower, you will be safe, but the guard and his nearby buddies will continue to search for you indefinitely. Just take a bathroom break and grab a sandwich. 10 minutes later, voila! You have the achievement. You can now do a leap of faith from the tower and dispel all of the guards' pent-up rage as you slip away quietly.

  2. THE COWARD'S WAY

    Okay, so it's not as cowardly as #1, but it's still pretty cowardly. Again, go into the Kingdom and grab a horse. Get the guard's attention and then get on the horse. The trick here is to avoid the guards without getting too far away from them -- if you do, your suspicion level will go to zero and you'll have to restart the process. Try to stay in a fairly confined area that doesn't have any archers. (The entrance from Masayaf is perfect.) After ten minutes of displaying your fine horsemanship, you should have this one in the bag.

  3. THE HERO'S WAY

    If you have decent fighting skills and are fully in sync with Altaïr (all 20 bars in the DNA sync meter) you can get this achievement at the same time you complete the Eagle's Challenge achievement. (See below.) Killing 25 guards in a sane manner will take about ten minutes, so you can do both of these at the same time.

EAGLE'S CHALLENGE (20G)

While you can certainly try to Rambo this achievement, I've found that a more conservative approach, invloving a lot of running, works well here.

I recommend doing this in the Kingdom, starting in the cluster of villages in the North-central area. There are PLENTY of guards around, which you will need to accomplish this.

First off, realize that you can't kill every guard around you or you will end the fight, so always leave somebody alive and start running when the battle gets down to one or two guards.

Secondly, don't bite off more than you can chew. If you are surrounded by more than six guards -- RUN! You will eventually lose most of them.

Thirdly, be an opportunist: if you have a good lead on the pack and see a new guard who doesn't see you, switch to your hidden blade and jump him! You can then decide whether or not to switch back to your short blade or keep running.

So, with the above in mind, the plan is to pick a fight, get noticed, fight when the odds are in your favor (5 or fewer guards) and run when they aren't or when your synchronization (health) is low. If things get too crazy, find a tower and heal -- just don't do the leap of faith into a hay bale or you'll end the fight prematurely.

Also, Templars can be your ally here if you are gettin glow on synchronization. Killing a Templar will always refill your sync bar! And most guards will back off and watch a Templar fight. (Note that I said "most", not "all".) So if you are low on health and you have an uncaptured Templar nearby, take him on! I did just that after taking out 15 guards during my attempt at this achievement and it worked great.

Remember, when you are down to one or two guards, run away and try to attract the attention of more guards. This will also give you a chance to regain some sync.

Happy Hunting!

Labels: , , ,

Wednesday, October 04, 2006

The Godfather for Xbox 360

Electronics Arts finally released the Xbox 360 version of The Godfather this month. (The game was originally released on last-generation consoles, including the Xbox, in March 2006.)

The Godfather is a sandbox game (ala: Grand Theft Auto: Vice City) set in Mario Puzo's violent vision of 1940's New York City. Playing through the story missions in the game, you are able to re-enact a number of scenes from the The Godfather movies, including the death of Luca, Sonny's bloody "typewriter" assassination and the horse's head in the bed. Without exception, the story missions were well-crafted and fun -- none of them felt like busy work -- a problem found any many sandbox games.

"This is a dangerous neighborhood. You could use some protection."

One of the cooler parts of the game is territory acquisition gameplay. This is a free-roaming part of the game where you take over territory by extorting business owners for protection money and take over various rackets for which the businesses act as fronts. You can employ a number of tactics to intimidate a shop owner: you can simply talk to them (if your reputation is high enough that's all that's necessary), you can hit them, grab them and shake them up, destroy their property, assault customers, destroy their window displays, etc. Each shopkeeper has a method of intimidation that they are weak to and finding that weak spot will earn you additional respect and a bigger stake in the business. You can also push a business owner too far -- then they'll fight back and can't be convinced by any means to come under your protection.

Your goal in all this (in addition to increasing your income and reputation) is to take over each of five territories: Little Italy, Brooklyn, New Jersey, Hell's Kitchen and Midtown. Each of these territories is initially controlled by one of the Five Families: The Corleones, Tartaglias, Straccis,

The game has an RPG aspect where various character attributes can be built up through the course of the game.

[[[text sadly ends here -- I'm not sure why this review was not finished]]]

Labels: , , , ,

Thursday, August 24, 2006

Revolution was such a good name

I was just having a conversation with A Vicarious Nin over the Xbox Live Messenger service about the Nintendo Wii, (which we are both excited about), and the changes it will bring to the American Lexicon.

AS A VERB

First off, I see the word immediately taking on a verb tense:

"Yeah, I'm going to Wii as soon as I get home."

"Mommy, I gotta go Wii. I gotta Wii! Please let me Wii!"

"The best place to Wii is in your home theater."

"'To Wii or not to Wii', that is the question. Whether 'tis nobler in the mind to suffer the financial assaults of Sony or submit to the will of a stereotyped Italian plumber..."

And you know it will someday come to:
"Like Microsoft says, it's good to Wii together."


AS A NOUN

Of course it is as a noun that wii, er, we, will see the most dramatic changes to everyday speech.

Nin suggested that Nintendo's advertising campaign should feature the music of Queen, with the rock anthems "Wii will, Wii will rock you!" and the suitable, but grammatically incorrect "Wii are the Champions". Hey, that's a better approach, in my opinion, than those wacky E3 promos.

In Great Britain, where the infantile word "wee" is considered the polite way of expressing urine -- I mean, of saying urine -- confusion and smiles are sure to abound. For example, consider this discussion, soon to be overheard in a posh London Cafe:

Gamer 1: "I've put my Wii inside my entertainment center."
Gamer 2: "Aren't you worried about heat? I leave my Wii on top of the telly."
Gamer 1: "Hmm... now that you mention it, my Wii does get rather warm -- and it's starting to smell funny."


But the greatest concerns of the noun tense are those that have a less savory nature.

The very first RSI injury that happens as a result of "playing with your Wii" is sure to raise a few eyebrows. And just how will it be possible to make the invitation "hey, come over to my place and we'll play with my Wii" without cracking a lecherous smile?

I believe that Nintendo USA has already rejected the following slogans:
  • "My Wii is my Playground"
  • "Nintendo: Because you have to Wii every day"
  • "Everyone wants to play with your Wii"
  • "Because every woman wants a man who knows how to handle his Wii"
  • "Wii: a hands-on experience"
  • "Wii: because size really doesn't matter"
Nintendo, are you sure this is the name you want to go with?

Labels: , ,

Thursday, August 10, 2006

Dead Rising -- Wow!

I spent a few hours with Dead Rising last night.

Wow.

No, seriously: "Wow."

This game has a strong story, hard emotional triggers and excellent gameplay -- once you've figured out how to play it.

Before that, it's an exercise in frustration.

As a public service, here are my quick tips for getting started with Dead Rising:

  1. Plan your game around the save points. This is the most important tip. The game rarely auto-saves, so it's up to you. Here's what I do: When heading to an objective point, first look at your map and find the save point that is nearest your objective. (Most of the game's save points are in public restrooms, which can be found in the mall and in some shops, like the fitness center.) GO TO THE NEARBY SAVE POINT FIRST AND SAVE YOUR GAME! Then go find your objective. Now if something disastrous happens, you can restart the game without having to retrace your steps too much.

    If your objective is a save mission, be sure to save your game in the security area as well.

    If you've finished a boss battle, find the closest save point before going anywhere else.

    If there is a save point along the path you are taking, use it. Having convenient saves to back to will dramatically improve your experience with this game.


  2. Arm your survivors. Just before going in to make a rescue, stock up on weapons -- especially guns. Once your survivors have agreed to follow you, equip a weapon, face each survivor and press the [B] button to give them the weapon. Not all survivors will take weapons -- many women will opt to hold your hand instead. But for those that will accept the weapon, they are generally pretty good shots. I tend to give my survivors handguns and equip a good melee weapon for myself. This tip will drastically improve your success in securing survivors.


  3. When a survivor dies, or a scoop expires, forget it and move on. Don't dwell on it -- this game intentionally gives you more goals than you can possibly accomplish -- at least, without the maintenance key.

    This game is designed to be replayed. You can get the scoop on your next time through.


  4. Always face Frank to the action. This is the key to getting good photos and for making the best of projectile weapons (like golf clubs and handguns.) For photos, Frank's lens is always facing in the direction his body faces, so to spend less time trying to get things in frame, face Frank toward the action before pulling the left trigger. For projectile weapons, facing your target is the easiest way to take them down without going into aim mode with the right trigger.


  5. Prioritize your time in favor of the main story. If a rescue mission is going too long, abandon it and get to the objective point for the main scenes. If you don't, it will quickly be "Game Over" and there's nothing you can do about it.


  6. Take lots of photos. Prestige Points (PP) are the key to leveling up in Dead Rising. Good photos can secure you plenty of points. I've gotten as much as 10,000 PP from a single photo.

    As a side note, if you miss a good, triggerable photo opportunity where the "PP" icon appears above the heads of your survivors, it's often worth restarting from your last save to set up and get the shot. (Another reason to follow tip #1!)


  7. Keep your camera batteries fresh. There are a few camera shops in the mall where you can reload your batteries. Get to know where all of them are and be sure to use them whenever you are nearby. (On your map, look for a rectangular battery icon with + and - terminals marked on it.) A dead camera battery can lose you a shot worth thousands of PP.


  8. Review your special abilities often -- and USE them! As you progress through the game, you will learn new abilities. You can see your new moves and how to actuate them on the Skills screen in the Pause menu. (Press the [Start] button.) One of your earliest abilities, the Zombie Walk, can get you out of tough scrapes and is simple to learn. Later skills, like the Eviscerator, are just plain awesome to do. Don't get so caught up in the weapon gathering side of the game that you forget about your innate talents.


  9. Use the Guide button and press "[Y] Go to Dashboard" to reload a saved game. Like so many Japanese PS2 games, there is no in-game option in Dead Rising for restarting from a save point -- without dying first, that is. "Go to Dashboard" is the more sophisticated Xbox 360 equivalent of the PS2's soft reset. Just hit "Play Game" once you're in the Dashboard to restart the game without ever getting up from your recliner.


I hope this helps. Following these tips can be the difference in your perceiving Dead Rising as an awesome game instead of a frustration fest.

Labels: , , ,

Thursday, July 13, 2006

The Death of a Video Game


I thought I'd post a follow up on the research it took to find out whether the Xbox title Rent A Hero No. 1 was released in North America.

Here's the story, as best as I can piece it together from various sources around the web:

Rent A Hero No. 1 was a game centered around a teenager who moves into a new town and is mentored by a crazy old professor into becoming a Hero and saving the small town from impending disaster. The game had very quirky humor and was intended to appeal to audiences familiar with titles like Sierra's Space Quest series. The game was originally developed by Sega for the Dreamcast in 2000.

The Xbox version of the game, developed by Coolnet Entertainment, was licensed to Sega for distribution in Japan and International markets, but licensing for North American distribution was granted to AIA USA, Ltd.

At the 2003 E3 show, AIA received a large number of orders from retailers for the game, which was to be released in late summer that same year. But localization of the game into U.S. English suffered a number of production delays, pushing the street date out to February 2004. In September of 2003, there was a glut of Xbox titles languishing on retailer shelves, causing many retailers to cancel their orders for the delayed Rent A Hero. AIA found themselves finally ready to go into manufacturing with fewer than 10,000 units on order.

Unfortunately, Microsoft will not grant a license to any Xbox game targeted for North American sales that does not have retail support for at least 10,000 units. Microsoft would not allow Coolnet/AIA to go forward with the North American version until they had retail support for the minimum number of units.

In September 2003, AIA issued a press release stating that release of the game had been postponed:

On behalf of AIA USA, Ltd. we are regretful to say that Rent A Hero No.1 has been postponed. At this time we cannot give out a definite release date. Due to the market structure AIA was unable to release Rent A Hero No.1. It is an unfortunate matter that the market has changed so drastically in such a short period of time.


In late 2004, AIA USA, Ltd. was shut down by its parent company, AIA Japan.

The latest information I can find indicates that Coolnet is still looking for a new publisher and a strategic publication date for the title.

So, it turns out that despite any evidence to the contrary, the game was never released in North America. In fact, it has only been released in Japan. Release to all other international markets was also postponed.

Labels: , , ,

Tuesday, November 22, 2005

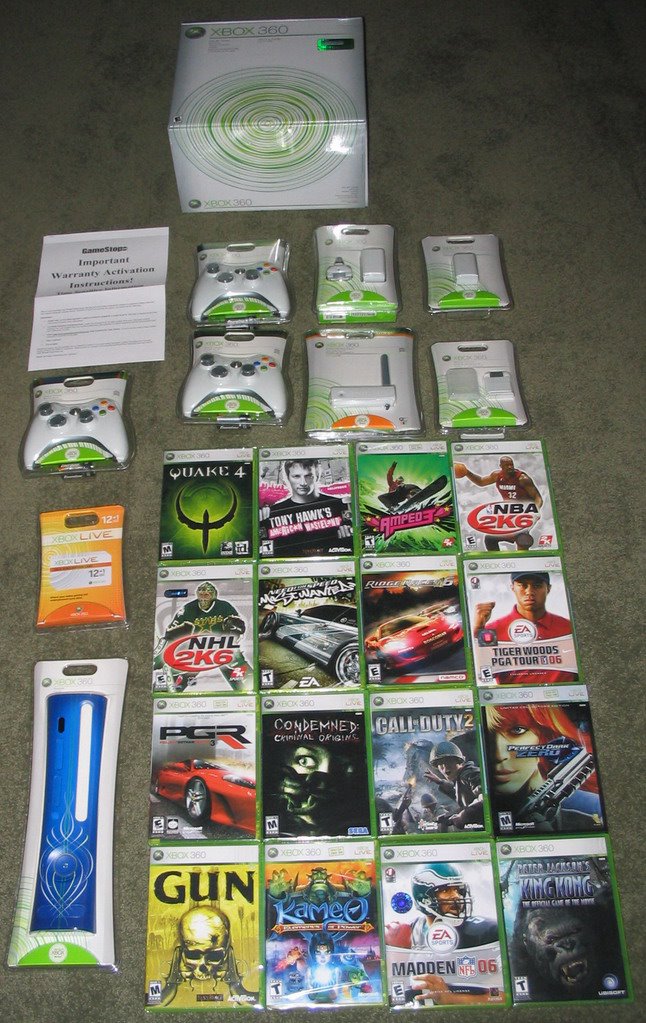
The Xbox 360 is here!


This just arrived. I haven't even opened anything up. But once this photo is posted, I'll be in 360 City for the rest of the night.

Look for the Gamertag "Cold Justice".

Labels: ,